Turn your serial port into a hardware monitor: reading dry contacts
Don't want to design or buy whole device for reading relay state? You can use RS232 port or converter with some soldering.

Have you ever needed a quick, zero-cost way to interface a physical switch or relay with your computer? Before reaching for an Arduino or a dedicated GPIO board, look no further than that dusty old RS-232 serial port (or a cheap USB-to-Serial adapter).
By leveraging the hardware flow control lines (RTS/CTS and DTR/DSR), we can read the state of external mechanical switches directly in software.
Let's dive into how it works, the wiring, and how to implement it in C#, Python, and Rust.
CRITICAL SAFETY NOTICE: READ THIS FIRST
⚠️ WARNING: The code and concepts provided here are for educational purposes only. This is a direct hardware hack and carries inherent risks if misconfigured.
1. Dry contacts ONLY
ONLY CONNECT DRY RELAY CONTACTS TO YOUR SERIAL PORT!
- ❌ NEVER connect any external voltage source to serial port pins.
- ❌ NEVER connect mains voltage (120V/230V AC power) to these circuits.
- ❌ NEVER connect powered circuits or active electronic signals.
- ONLY connect isolated, unpowered relay contacts (dry contacts).
- Use mechanical switches or relays with absolutely no external power on the contact side.
2. Disclaimer
Use this guide entirely at your own risk. The author takes no responsibility for damaged computers, fried serial ports, destroyed equipment, data loss, personal injury, or any other consequences resulting from attempting this project. You are solely responsible for ensuring safe connections and proper isolation.
What is a "Dry Contact"?
A dry contact is a secondary circuit element (like a relay contact or a simple toggle switch) that has no voltage or power applied to it from the outside world. It is a purely mechanical closure.
In this setup, our serial port acts as the power source and the sensor simultaneously. The serial port outputs a low-voltage signal (~5V to 12V) on an output pin. When the mechanical switch closes, it routes that exact voltage back into an input pin, completing the circuit and triggering a state change in your code.
Hardware connections and schematic
To read two independent switches, we use two separate pairs of control lines. Notice that Ground (GND / Pin 5) is NOT used here—each signal pair is entirely self-contained.
- Relay / Switch 1: RTS (Pin 7) → Dry contact → CTS (Pin 8)
- Relay / Switch 2: DTR (Pin 4) → Dry contact → DSR (Pin 6)
Wiring diagram
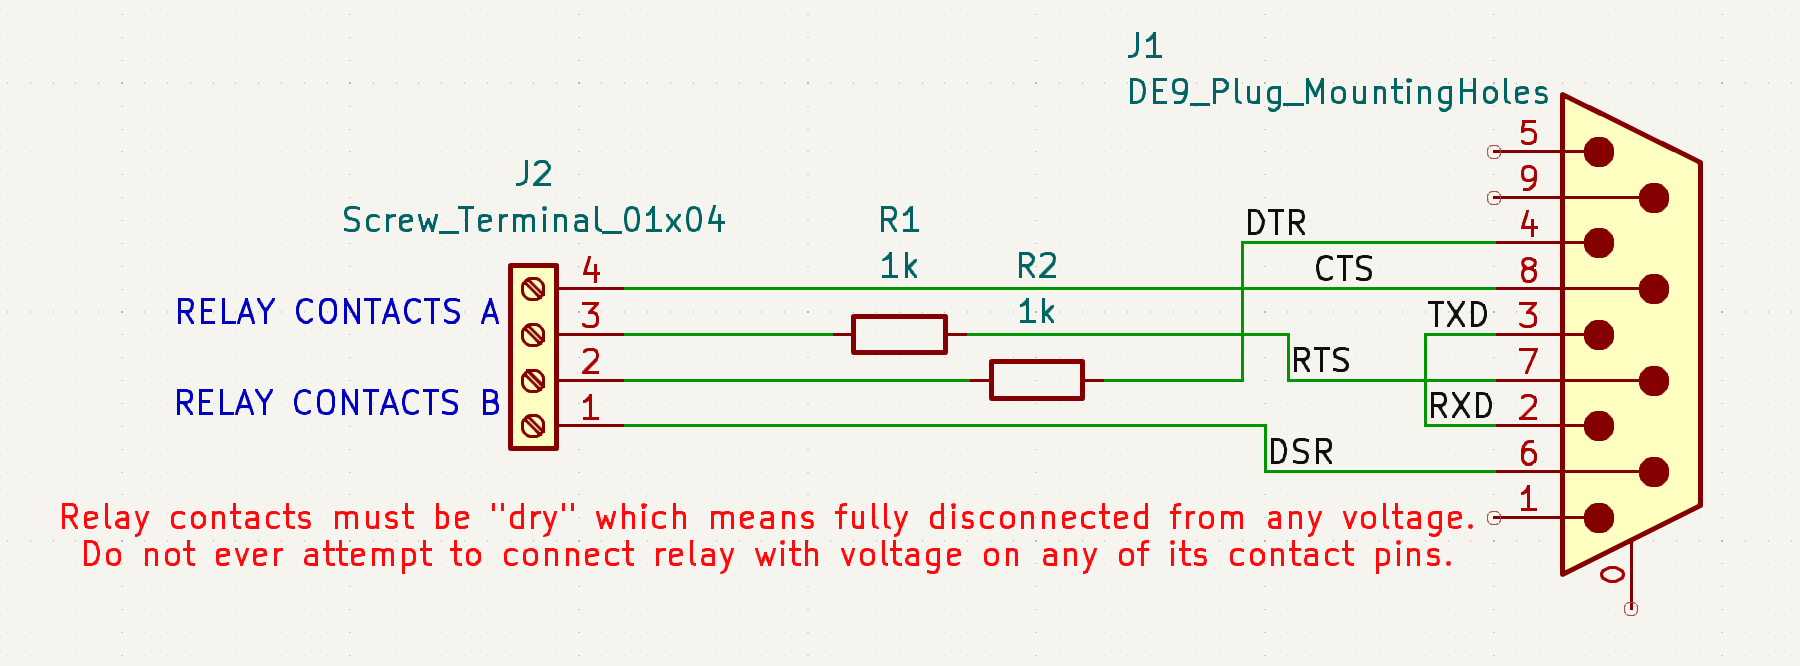
Note: Pin numbers correspond to a standard DB9 serial connector.
Code implementations
To make this work, the software must explicitly pull the output lines (RTS/DTR) "High" to provide power, and then continuously loop to read the status of the input lines (CTS/DSR).
1. Python implementation
Python makes hardware prototyping incredibly fast using the pyserial library.
pip install pyserial
import time
import serial

# Configure your port (Change 'COM3' or '/dev/ttyUSB0' as needed)
PORT = 'COM3'

try:
    ser = serial.Serial(PORT)

    # Energize the output lines to act as our voltage sources
    ser.rts = True
    ser.dtr = True

    print(f"Monitoring dry contacts on {PORT}. Press Ctrl+C to exit.\n")
    print("CTS (Switch 1) | DSR (Switch 2)")
    print("---------------------------------")

    last_cts, last_dsr = None, None

    while True:
        # Read the current input states
        current_cts = ser.cts
        current_dsr = ser.dsr

        # Only print if a state changes
        if current_cts != last_cts or current_dsr != last_dsr:
            status_1 = "CLOSED" if current_cts else "OPEN"
            status_2 = "CLOSED" if current_dsr else "OPEN"
            print(f"Switch 1: {status_1}   | Switch 2: {status_2}")

            last_cts = current_cts
            last_dsr = current_dsr

        time.sleep(0.1)

except serial.SerialException:
    print(f"Error: Could not open serial port {PORT}. Check your connections.")
except KeyboardInterrupt:
    print("\nMonitoring stopped.")
2. C# (.NET) implementation
For Windows environments, natively accessing native hardware via .NET is highly efficient.
using System;
using System.IO.Ports;
using System.Threading;

class Program
{
    static void Main()
    {
        // Change to your specific COM port
        string portName = "COM3";

        using (SerialPort port = new SerialPort(portName))
        {
            try
            {
                port.Open();

                // Drive outputs high to supply sensing voltage
                port.RtsEnable = true;
                port.DtrEnable = true;

                Console.WriteLine($"Monitoring {portName}. Press any key to exit...\n");

                bool? lastCts = null;
                bool? lastDsr = null;

                while (!Console.KeyAvailable)
                {
                    bool currentCts = port.CtsHolding;
                    bool currentDsr = port.DsrHolding;

                    if (currentCts != lastCts || currentDsr != lastDsr)
                    {
                        Console.WriteLine($"[{DateTime.Now:HH:mm:ss}] Switch 1 (CTS): {(currentCts ? "CLOSED" : "OPEN")} | Switch 2 (DSR): {(currentDsr ? "CLOSED" : "OPEN")}");
                        lastCts = currentCts;
                        lastDsr = currentDsr;
                    }

                    Thread.Sleep(100);
                }
            }
            catch (Exception ex)
            {
                Console.WriteLine($"Error: {ex.Message}");
            }
        }
    }
}
Summary
Using a serial port for basic I/O monitoring is an elegant solution for simple automation tasks, door sensors, or physical panic buttons. However, always remember:
- Verify with a multimeter: Before connecting any relay to your PC, use a multimeter's continuity mode to ensure there is zero voltage flowing through your target switch contacts.
- Mind the port names: Linux platforms use naming conventions like
/dev/ttyUSB0or/dev/ttyS0, whereas Windows relies onCOM1,COM2, etc. Ensure your code reflects your environment.
Happy hacking, and stay safe!